


Subject: BAe Sea Harrier FA.2
Manufacturer: Xtrakit (XA72006)
Scale: 1:72
Price: £11.73 (Hannants)
Optional Extras Used: Scratchbuilt Intake Blanks (Soon available from Jenesis Designs)
Reference: Various Internet sources, SAM modellers Datafile
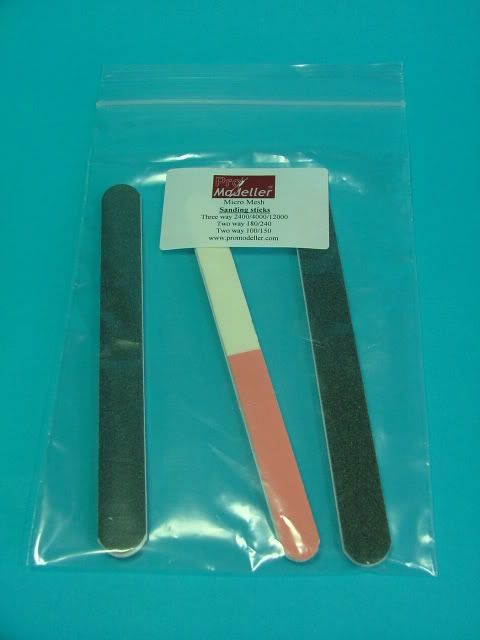
This is a full run through of my recent build of the Xtrakit Sea Harrier done for review here on Promodeller.com. I have built the kit out of the box, apart from adding some scratchbuilt intake blanks. Right, starting with the obligatory box and contents shot you can see there are just 2 sprues containing the main parts, and 1 for the clear parts. A nice looking decal sheet is provided which is very crisp and cleanly printed One of the first things I noticed with the kit was that the distinctive wing vortex generators are sort of missing. I say sort of as they are strangely represented by some recessed lines, rather than anything sitting proud. Also depicted in this way are the wing fences. These could be easily made with some plasticard if you so desired. Kicking off the build with the cockpit there are some very basic parts involved, along with a crude ejection seat. This is certainly something that needs some aftermarket attention, even if it is just a resin seat to be added for some detail. The parts were painted up and some very simple Tamiya tape belts were put on the seat to break up the blandness and attempt to impart some detail. Once completed, the cockpit tub is sandwiched between the halves of the front fuselage section. A rather oversized piece is provided for the top of the instrument panel where the HUD would fit. Things then move towards the rear fuselage section that is the main part of the fuselage. 2 halves are provided, but make sure that the moulding stubs from inside there are rubbed down… they were a bit prominent and if you don’t take the tops of them off, they will interfere with the fit of the halves. I found one strange issue when I put the halves together in that it seemed that one half was ever so slightly shorter than the other. I lined mine up so that the details matched in the centre, but either side of that the details ran out of alignment with each other, and the bays for the undercarriage and airbrake also misaligned. Next step involved joining up the 2 sections of the fuselage. Before this is done, the intake fan and ducting is added to the rear of the front section. This then is supposed to slot back into the other section, but I found that the gap was larger than the piece going in there. This resulted in a very vague connection there and no positive position for the nose section to sit, either in vertical or horizontal alignment. No matter what I did in joining these sections, it still left the front end looking like it was pointing slightly upwards, giving the whole thing a bent look. Some attention is then required to make good the seams and step in the join of these sections. Lots of the detail will be lost here when filling and sanding, so either re-scribe it a little deeper in the hope of keeping it afterwards, or just bite the bullet and lose it! Moving on I fitted the nose and have to say that it just looks very wrong… the profile is very much out, and along with other suspect lines at the front makes it very strange looking. Again there is a rough join that requires attention (a recurring theme all the way with this build!) At this point I moved on to cleaning up all the joins and seams where needed (everywhere!) Provided for this task was a nice new set of Promodeller Micro Mesh sanding sticks. These are very good quality and work exceptionally well. Working from the 100 grit, down to a 2400 polishing grit, these were perfect for the job at hand. Here is the Fuselage once it had been cleaned up. Installation of the main intake parts came next, and provided more major problems! Looking at the parts before even trying to fit them, you are confronted by some awfully uneven surfaces with sinkage all over the place. There is also the issue of the join between the rear half of the trunking (attached to the fan part) and the front section on the intakes. This would be a very awkward join to rectify where it is positioned. Here I had to make a decision on what to do… Fill, sand and reshape all the interior of them, or come up with some other plan! Already getting jaded with sanding and filling I made the decision that scratchbuilding some intake covers would be an easier job at the time!! This decision also meant that I could just fit the intakes and not worry about painting the internals of them (lazyness shining through again!) Offering up the intakes to the fuselage showed that they were slightly wider than the area they fitted to, and would again require a little re-shaping to make good. They also needed a little bending in order to come to the correct shape of the fusleage, so superglue was used to attach them and force them into position. As you can see in this shot, the inner areas would required copious quantities of work to make something anywhere near a smooth trunking. Unfortunately I forgot to shoot some pictures of the wing attachement. When I test fitted them they didn’t sit right at all, standing quite proud at the join, and the dihedral was all over the place. I fiddled and fettled with them, but was getting nowhere near them looking like fitting. Drastic measures then took place in removing the entire fitting stub from the wings, and sanding flat the end of the wing to the correct dihedral. Then it was just a case of using CA to attach them where they should be, rather then where the lugs wanted to push them up to. Work was still required on the actual join seam, but only a minor running of CA/talc filler along there and sanding down to make good. While doing the intakes, I was also fitting in the airbrake which again doesn’t really fit! Gaps were all around it, and I had to pack the inside so that it would actually sit at the right height. Copious amounts of Superglue and talc filler were applied in there to pack out the outer edges ready for more sanding and re-shaping. Once the Intakes were filled, shaped and sorted out, the details were all re-scribed in and they looked reasonable. Same goes for the airbrake, which had the same treatment. Lots of re-scribing followed where details had been erased by the sanding and taking quite a bit of time. Are you getting the feeling that this was very tiresome by this point of the build!! Anyway, after making good all of the details and having something that was now looking a bit like a Sea Harrier, I moved on to fitting the canopies prior to painting. This is the point in the build where I very nearly gave up completely on a build for the first time. Test fitting the canopies left me speechless when I found that they were pretty oversized for the kit!! Popping on the windscreen section I found that it was about 2mm too long for the recessed area provided for it to sit in on the kit… and then to compound things it was also about 3mm too wide for the fuselage! The rear section was just as bad, being slightly worse on excess width. Here’s some shots of them resting on the fuselage. They are aligned to the left hand side of the fuselage, and the ‘overhang’ can clearly be seen on the right side. I decided to leave well alone for now, and ponder the prospect of trying to fit these. While doing that I moved on to making up the exhaust nozzles. These are provided in several parts being a main nozzle for each, and then 2 separate vanes to be added inside. These parts need a little clean up as there is some flash on there, plus some prominent mould lines, but once rubbed down look good. The vanes are moulded really thin, which is something that is good at last on the kit! Initially I expected the vanes to be difficult to fit into the nozzles, but with a little care, they just dropped neatly into place and a little glue applied fixed them firmly into place. Painting of the nozzles and heat shield was done using Alclad II laquers. The 4 nozzles were sprayed with the ‘Jet Exhaust’ colour and then the rear ones given some matt black overspray to represent the sooting seen extensively on all early Harrier models. The fronts were left clean as these are ‘cold’ nozzles. ‘Pale Burnt Metal’ was used on the heat shield, and again given some matt black ‘sooting’ in the crescent shape commonly seen on the real thing. Right, back to the canopies! The only way I could conceive fitting these onto the kit was to use Superglue. Now usually superglue and clear parts don’t mix well, but I dipped the canopies in Klear beforehand to attempt to reduce this risk. At this point I was actually too busy trying to do things that I forgot to take pictures again, but I will describe what I did! Starting on one side of the canopy I attached the edge with superglue and let it set. Once firm I had to press and bend the lower part of the opposite side inwards towards the lip of the cockpit, again attempting to fix with superglue. Quite some pressure was needed to bend the clear parts into shape, but luckily they were not too brittle and did have some give. I think a lot of clear parts may have snapped when trying this, but these didn’t (phew!!) Not all was rosy though as the pressure had made the clear plastic craze where the pressure had taken it’s toll on it, but nothing could be done about that now. Not looking very healthy around the join of the canopy to fuselage I needed to fill in the area and blend it back in. For this I used some of the thick gloop from Tamiya surface primer and applied that to the area. This is great for filling in small areas as it sands really smoothly and can be re-scribed easily too. After a couple of applications of this, and a little more sanding, I had the canopy on there at last. Next came the fitting of the underwing pylons. As the kit is of a limited run nature, there are no fixing points for the parts, so you are left to your own devices as to where and how they are positioned. Examining some plans I figured out where the pylons were to be, and set about test fitting them. First problem is that the mating surface of the pylon to the wing is flat at 90 degrees on all 4 pylons. Now the Harriers wing has quite a downward dihedral to it, so these need to be shaped at an angle in order to fit the wing properly. Not much of a problem, but still an annoying little task really, Lastly I popped on the refuelling probe, again needed to check references as to where it actually fitted. Once more the mating surface was flat and needed shaping to fit to the curved surface of the intakes. A little drop of primer as filler around the edges of it, and this was done. Now I was finally ready for the paint shop! Being a nice simple colour scheme of Medium Sea Grey, this was quite a quick job. Firstly I applied an overall coat of Medium Sea Grey and then added some darker and lighter greys for shading effects, providing some weathering features into the paintwork. Then another fine coat of the Medium Sea Grey was applied over the top in order to blend this all together. After this a quick coat of Klear was applied in preparation for decalling. I was finally beginning to feel like I had overcome most of the problems that this kit could offer, and that there was light at the end of the tunnel at last. All that remained was to decal the kit, and attach the undercarriage parts and wing tanks, then it was all done. My premature hope was soon dispelled by applying the first decal! On the sheet the decals look pretty nice being in perfect register and nicely crisp in printing. My starting point was the tail and I removed the checkered rudder decal and popped it in the water. When attempting to remove it from the backing sheet, it was so fine that it continually attempted to fold under or over itself on leaving the paper. After some fiddling, I got it onto the model, but again any attempt to reposition it resulted in folding. Decalling pretty much continued in this fashion with lots of time spent attempting to unravel some serious folding, scrunching, and contorting of said decals! I did have a number of major problems in that a couple of decals screwed themselves into such a mess they were impossible to retrieve. The first one to do this to me was one of the black ‘omega’ tail decals. Luckily being a black one, I was able to reproduce this using clear decal sheet, and print myself another home made one. I did lose another 3 stencil decals to this problem, and being white once I was unable to reproduce them. All in all the decalling process was fraught and time consuming as the decals were a little too thin really. That being said, they actually looked fantastic once on the model and settled in very well without the needs of any setting solutions. No carrier film was visible and the markings were very crisp and clear. The undercarriage was added with no problems whatsoever, and the outrigger wheels actually both perfectly touched the floor, which surprised me. I was expecting some work on these to make them sit correctly. The final touches were to apply the Promodeller dark wash overall, and add some more weathering typically seen on First Generation Harriers. The underside of Harriers is usually marked distinctly orangey by the leaking of hydraulic fluids, and the rear area comprehensively marked by sooting from the exhausts. To apply the hydraulic fluid I mixed up some Tamiya Desert Yellow and added a touch of orange, spraying this lightly onto the affected areas. The sooting was provided by using a varying mix of Tamiya Matt Black and Flat Earth where appropriate, and again built up in layers. A final matt coat was then applied, canopy masks removed, and my scratchbuilt intakes covers were added, using some aeroclub elastic thread as the ties. These blanks are soon to be released in the Jenesis Designs range available from Modelsforsale.com So… Here is the Xtrakit Sea Harrier finally done! Overall it is an acceptable result, but in my view the front end of the kit has some suspect shape issues. From the wing root forwards it all looks a little wrong to me, but from there back is pretty spot on… The ‘bent’ look to the front end really doesn’t help, but I still think it is wrong overall. Being that it is in 1/72nd scale, I think it gets away with it a little more than if it was a larger scale kit. The issue with the cockpit was really bad, but I believe that Xtrakit (Hannants) have rectified this now with a new canopy in the kit, which can only be a good thing. Even for the limited run nature of the kit, this took a lot of filling and fettling to make it fit, so not exactly one of the inexperienced. Karl Robinson August 2009