* Kit manufacture: Trumpeter
* Scale: 1/144
* Type: Type XXIII U-Boot
* Extras used: 0.12mm fishing line for the antenna wire
* Paints and colours used: Tamiya Light Grey Primer
Tamiya Acrylics: XF-69 Nato Black
XF-24 Dark Grey
XF-54 Dark Sea Grey
XF-2 Flat White
XF-59 Desert Yellow
XF-52 Flat Earth
Abteilung Oil Paints: 160 Engine Grease
110 Black
080 Wash Brown
060 Light Rust
070 Dark Rust
100 Faded Grey
Van Gogh Oil Paints: Titanium White
Paynes Grey
Cerulean Blue
Yellow Ochre
Alclad paints: ALC 115 Stainless Steel
ALC 110 Copper
ALC 104 Pale Burnt Metal
Vallejo Model Colour: 70862 Black Grey
70820 Off White
Games Workshop: Chainmail
Black Sharpie Pen (for colouring the antenna!)
Matt clear coat: Future (Klear) + Tamiya X-21 Flat Base
Hi All,
I'm been suffering from AMS which has stalled some other builds I have on the go. I saw this kit at my local model shop and instantly decided this was the fix I needed to get me back on track.
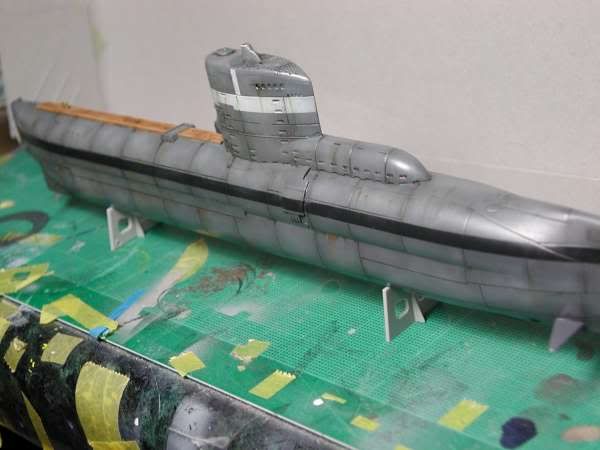
It's the Trumpeter 1:144 German Type XXIII U-Boot, which cost me all of £10.99 and has a grand total of 32 parts!! I've never built a sub before, but have loved the look of some of the well weathered boats I've seen done. I didn't want to get bogged down in research and accuracy or adding to the kit, so I just did a quick web search and found Chris Wauchop's 1:72 build of the same sub on HyperScale () and decided I wanted mine to look like that.
So here's the kit ...

The fit was pretty good and probably the fastest build I've ever done! Within minutes, the hull was together ...
The kit comes with three different bridges, and for speed, I chose the closed one with a hatch on top.
It didn't take long and the bridge was together and stuck to the hull. I left of some of the steering fins? elevators? I've no idea what they're properly called.
A tiny amount of filler was needed (superglue was used) and a coat of Tamiya fine grey primer was sprayed on. Then some quick and dodgy pre-shading with tamiya Nato Black acrylic.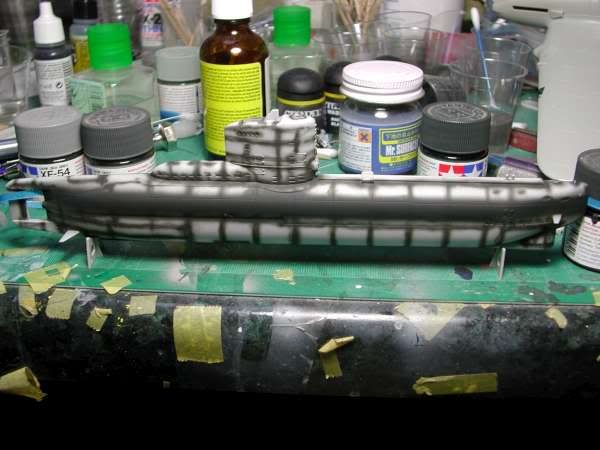
I then masked off the black line with some low-tack jammydog masking tape. In hind-sight, I should have done this much thinner.
Then painted the lower hull, and masked off to paint the upper section.
I used Tamiya XF-24 for the lower section and XF-54 for the upper. I did some random post shading with lighter and darker mixes of each of the colours.
After removing the masking, I was looking at this ...

Next I slapped on a couple of coats of Future (Klear) to protect the base colours before proceeding.
Next up was the white band around the bridge. I simply masked this up with Tamiya tape and sprayed a thin off-white mix of mostly tamiya XF-2 with a little grey mixed in. Before it could dry properly, I took a toothpick (cocktail stick) and scratched the paint a bit.
Then I masked and painted the wooden deck (?) on the front. Believe it or not, I've never really painted wood before, so this was a bit of an experiment. I used Tamiya XF-59 desert yellow as the base colour, then darkened it with some XF-52 flat earth and did some shading, followed by a lighter mix for some highlights. It doesn't look as pink as this in real life!!

Next up was another couple of coats of Future before the weathering could start.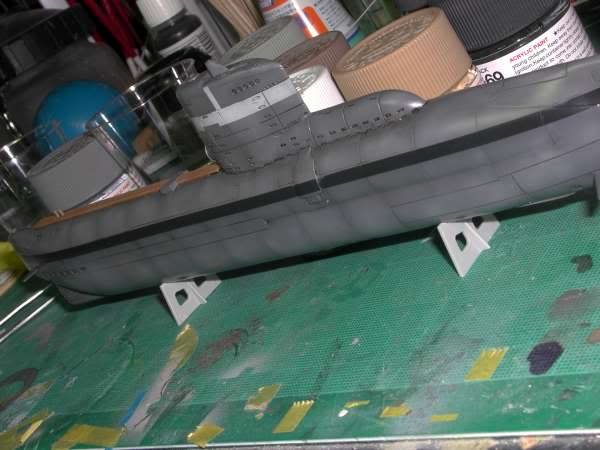
I started the weathering with a thin oil mix of black and wash brown, using the abteilung range of paints. I stuck to the panel lines and other nooks and crannies. Allowing it to dry for half an hour then wiped away the excess with a cotton bud and blended in other areas using a soft wide brush.
Next, I decided to given the dot-filter method of discolouring / fading a go. This method involves putting tiny random dots of different coloured oil paint over the base colours and then blending it with your thinner of choice (white spirit in my case, as it's far more gentle than turps).
These are the colours I used ...
Paynes Grey, White, Faded Grey, Yellow Ochre, Cobalt Blue
Blobbed on ..
And Blended...
This looks an almighty mess!! The idea is not to blend all the colours together, but to get subtle patches of different colours. If you have over done it, you can easily remove the paint with a brush or cotton bud and some thinners.
I played around with this for a while until I was happy with the effect.
Next up was weathering. I considered adding some paint chipping, but considering the scale, I decided I wouldn't be able to do it small and fine enough to look realistic. So I settled on making it look dirty and rusted.
I used oils again for this, namely old and new rust colours as well as engine grease.
And this is where I'm currently at. Waiting for the oils to dry before I can think about touching it. I'd really like to not clear coat it (either flat or satin) as it has a lovely mix of finishes at the moment, which will be lost if I spray it with something.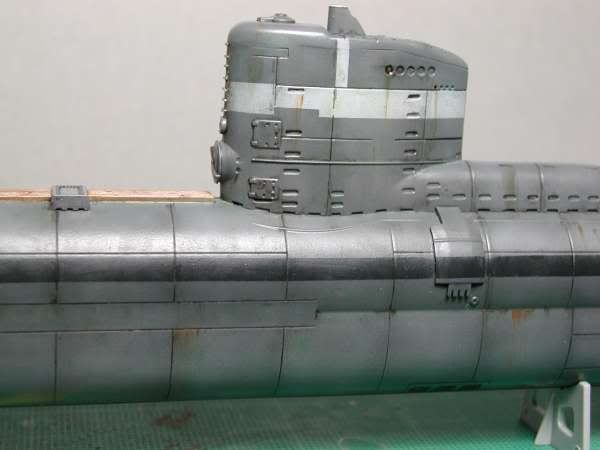
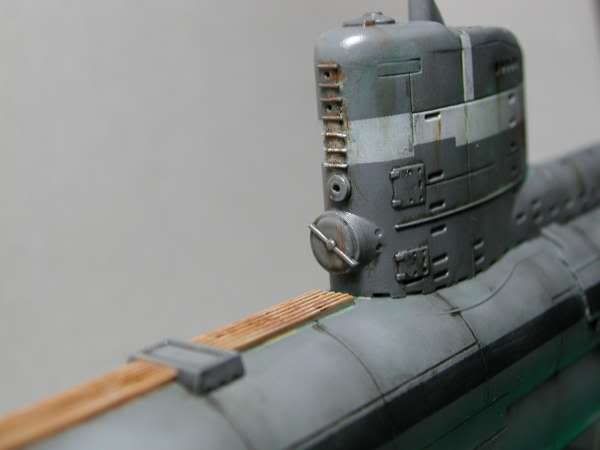
Those are meant to be steps on the front of the bridge, which I added out of streched sprue.


Working with the oils is really easy on a project like this. Just put small dabs on and blend them with either a dry flat brush, or make them run with a flat brush, very slightly moistened with thinners.
I'll be getting the fiddly, pokey-out bits done shortly and it'll be pretty much finished then. Yay!
The prop is on (painted a mix of alclad pale burnt metal and copper) and so are the sticky out bits. I had to admit defeat and gave it a flat coat so that I could seal in the oils and handle the wee beastie without fear of rubbing them all off. I'll try to give it a mixed finish when I'm done.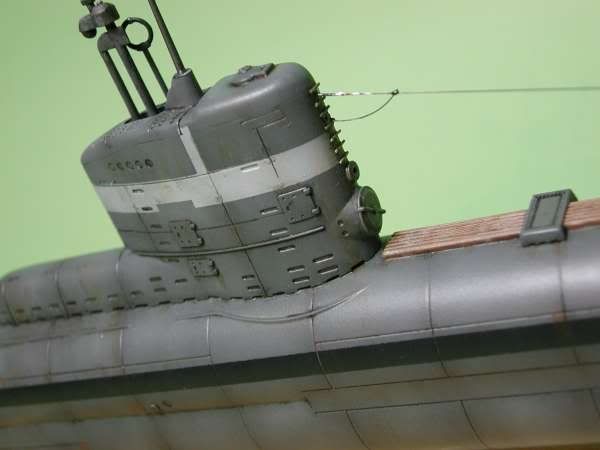
I've also added the antenna wire, using .12mm fishing line, coloured black with a Sharpie permenent black marker. The insulators are just blobs of white paint.
Here's an over-exposed shot with the flash to show off some of the colour variation.
Another view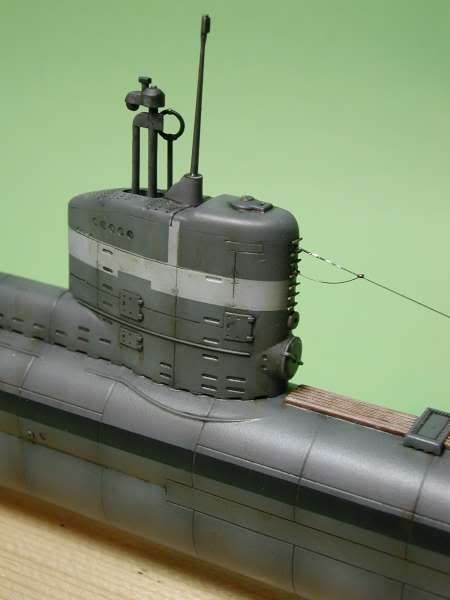
As you can see, I've made a start on creating a simple base / plinth for it from a spare plank I had in the garage. To give you an idea of size, the two blocks it's sat upon, are bamboo chopsticks with notches whittled out of them. :-)
I've just got to let things dry, stick the diving planes (wings!) on, and give it a final clear coat.
Finished! The dive planes were added, then I gave it a quick coat of future which gave it an overall satin finish. I then gave certain areas a second coat, to make them more glossy. I then used a paint brush and painted on neat future into certain areas and streaks going down the hull to give it that variation in finishes and the impression of water running down the hull. I'm fairly pleased with the effect as it has broken up the unnatural uniform appearance it had before. The base was simply sanded and given a couple of coats of matt wood varnish to smarten it up a touch. 


Thanks
Ant


Store


Kit Reviews
Video Builds


P&M Models